Welcome back to the VyHub Basics series! In the first part (Part 1: Creating Your Account and Instance in Minutes), we guided you through creating your VyHub account and exploring the VyHub dashboard. In Part 2, we are delving into the exciting process of connecting your gameserver to VyHub and integrating Discord. Let’s jump right in!
Why Install a Plugin on Your Gameserver?
Before we dive into the connection process, let’s understand why installing the VyHub plugin is crucial. This plugin enables your gameserver to connect seamlessly with our service through our API. It registers users joining your server, gathers statistics, and executes commands, ensuring that purchased items bought through VyHub are delivered to the players’ accounts efficiently.
Games and Integrations Supported by VyHub
VyHub supports a variety of games, including Garry’s Mod, Minecraft, and FiveM, with more titles currently in development! For a comprehensive list of supported games, check out our games page. Additionally, VyHub integrates seamlessly with Discord and Teamspeak, offering a multitude of possibilities, such as selling special VIP groups or restricting server access to registered or paying users. More details on these integrations can be found in another blog post.
Connecting Your First Gameserver: A Quick Three-Step Process
Connecting your gameserver to VyHub is a breeze, requiring just three simple steps. For a full technical guide check out our documentation. For some games, we have also created videos on our VyHub YouTube channel.
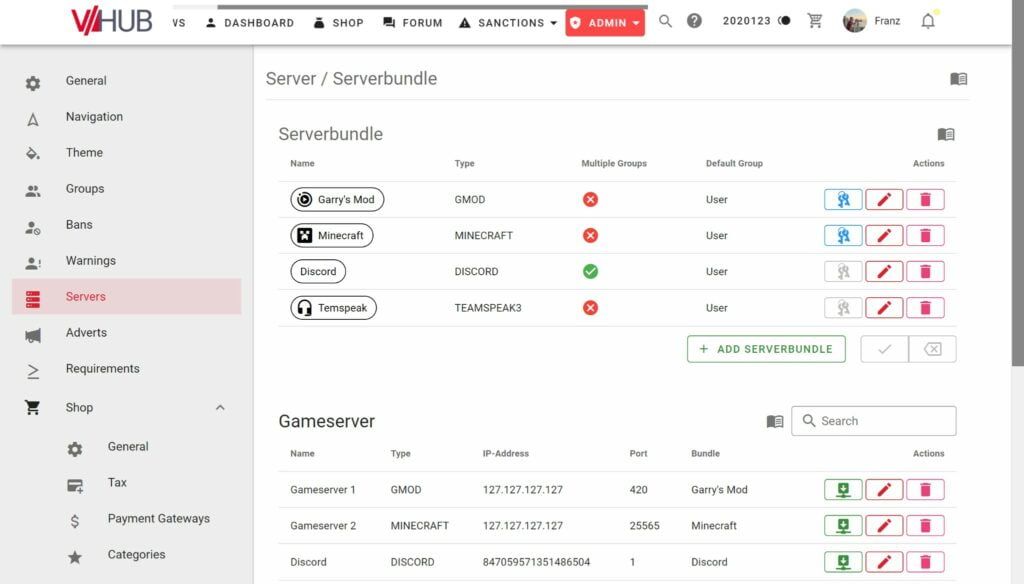
Step 1: Creating the Server in VyHub
- Begin by creating a Serverbundle and a Server in your VyHub instance’s server settings. A Serverbundle groups multiple servers of the same type.
- Provide a name and select a type.
- Then, in the VyHub interface, create the server by entering its IP address and port. These details can usually be accessed from your server’s hosting panel.
Step 2: Download and Install the VyHub Plugin
- Click the green setup button in the server interface to download the VyHub Plugin.
- Place the plugin in your gameserver’s plugins folder and restart your server to activate the plugin.
Step 3: Configuration and Connection
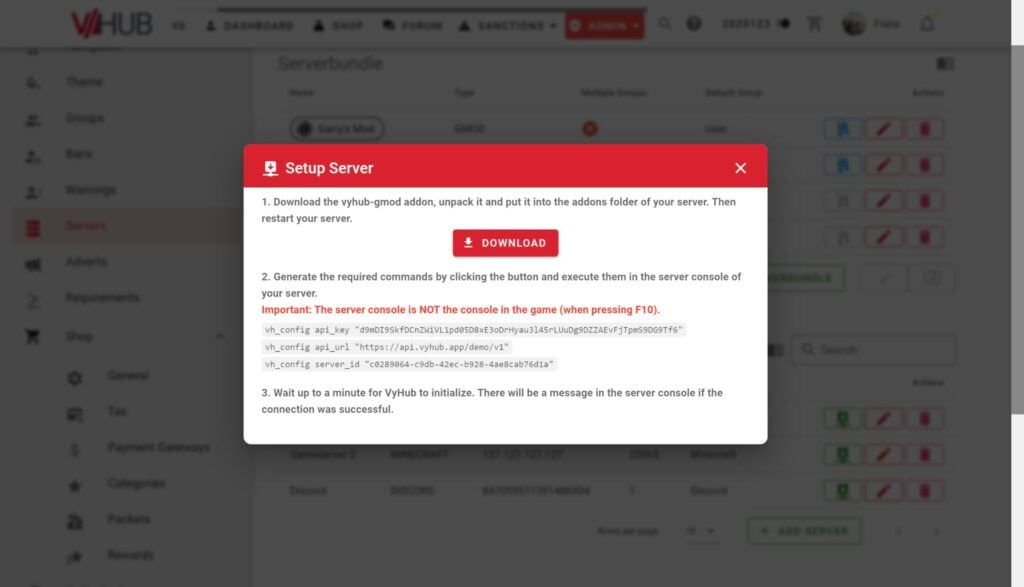
- After installation, configure the plugin by generating the required commands through the VyHub setup dialog.
- Input these commands into your server’s console. Within a short time, you’ll receive a success message in the console, indicating a successful connection between VyHub and your gameserver.
- Congratulations! Your VyHub plugin is now live, collecting stats, and ready to be used for player management. You can ban, warn players, and much more. In the next blog, we’ll introduce you to the shop system.
Connecting Discord: A Two-Step Process
Integrating Discord with VyHub is a slightly different process and doesn’t require plugin installation.
- During the installation, you have to create your own Discord Bot through the Discord developer portal.
- There, you will find all the secrets that need to be added to VyHub. You can find a full guide in our documentation.
Thank you for joining us in this blog post, the Pat 2 of our VyHub Basics series. Stay tuned for our next blog (Part 3: Setting Up Your Shop and Payment Gateways), where we’ll guide you through utilizing the shop system. Remember, the first part was all about creating your first VyHub instance. Let’s keep building your VyHub experience together!